As the new academic year approaches, it’s time to refresh your look with the latest nail art trends. I’m excited to share my top picks for nail designs that are perfect for students. These stylish and easy-to-create designs will elevate your style and make you stand out.

From classic colors to bold patterns, the top 10 designs I’ve curated will inspire you to try something new. Whether you’re heading back to class or just want to update your look, these nail designs for students are sure to impress.
Key Takeaways
- Discover the top 10 nail designs perfect for the new academic year
- Learn how to create stylish and easy-to-make nail art
- Get inspired by classic colors and bold patterns
- Find the perfect nail design to elevate your student style
- Stay on-trend with the latest nail art trends
Why I Love Creating Back-to-School Nail Art
Every year, I look forward to creating new back-to-school nail designs that reflect my personality. As a nail art enthusiast, I enjoy designing unique looks that are both stylish and relevant to the school season.
My Favorite Nail Trends for the School Season
This season’s nail trends include a mix of classic and modern designs. Some of my favorites are:
- Pencil and ruler French tips
- Chalkboard accent nails with math formulas
- Colorful bookstack ombré designs
Essential Tools and Polishes for These Designs
To achieve these back-to-school nail art looks, you’ll need some basic supplies and a few specialized tools.
Basic Supplies Every Student Needs
| Supply | Description |
| Nail polish remover | For cleaning up old nail polish |
| Nail clippers | For trimming nails |
| Base coat | For protecting nails |
Optional Tools for Advanced Designs
For more complex designs, consider investing in nail polishes with unique finishes, such as glitters or metallics. You can also use nail guides or stickers to create intricate patterns.
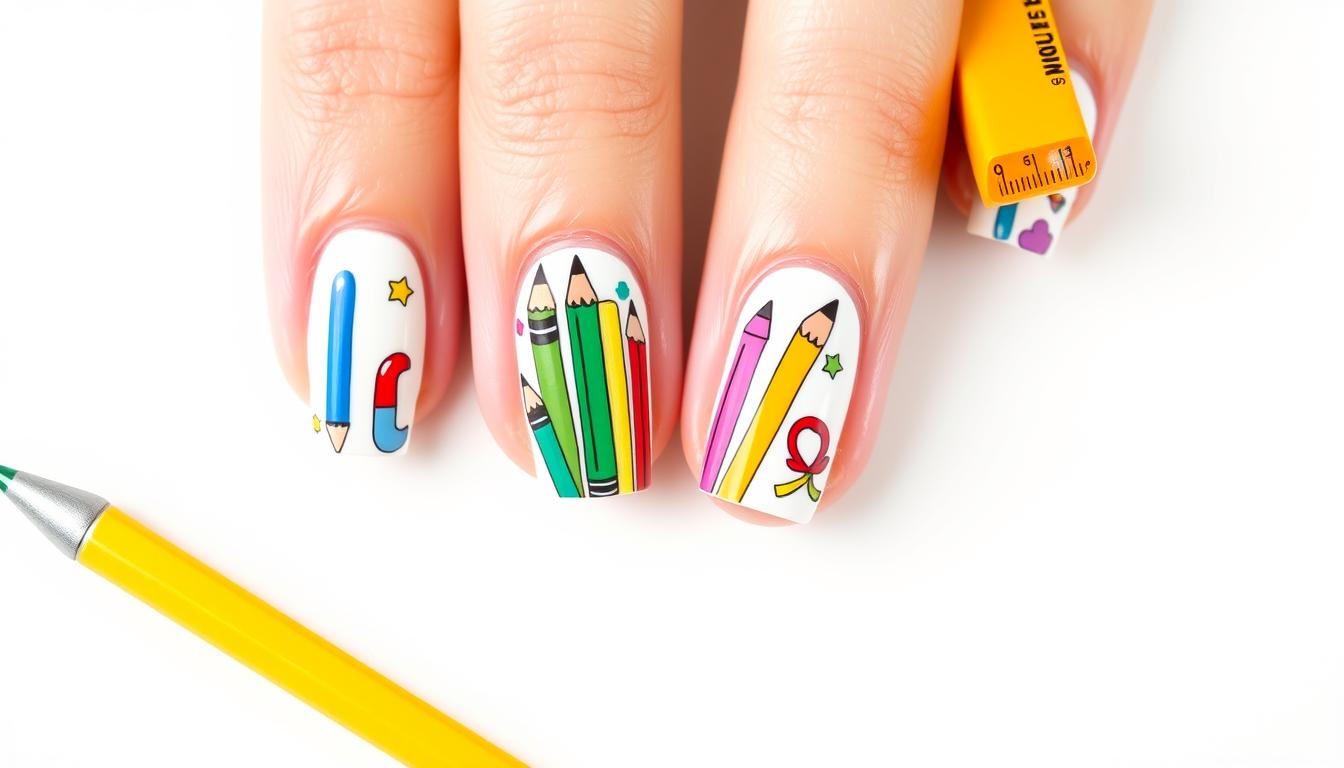
1. Pencil and Ruler French Tips
Pencil and Ruler French Tips are a creative spin on a timeless nail design, suitable for students looking for a stylish and sophisticated look. This design combines the classic elegance of French tips with a playful twist that references school supplies.
Difficulty Level: Beginner
This design is perfect for those new to nail art, as it requires minimal intricate details but still offers a stylish outcome. With a few simple steps, you can achieve a professional-looking finish.
Materials Needed
- Nail polish in white and your choice of base color
- Nail guides or stickers for French tips
- A thin nail art brush
- A gray or graphite nail polish for the pencil effect
- A nail art dotting tool or a small dotting tool
Step-by-Step Tutorial
Base Application
Start by applying a base coat to protect your nails. Then, apply your chosen base color. Let it dry completely before proceeding.
Creating the Pencil Effect
Using a thin nail art brush, paint a gray or graphite stripe down the center of your nail to mimic a pencil. You can use nail guides to help you keep the line straight.

Styling Tips
To enhance your Pencil and Ruler French Tips, consider pairing them with a simple, elegant outfit. This nail design is versatile and can be worn with various back-to-school looks. For an added touch, you can use nail art stickers or a dotting tool to create a “sharpened” tip effect at the end of the nail.
By following these steps, you can achieve a beautiful and unique nail design that’s perfect for the school season. French tips just got a whole lot more interesting!
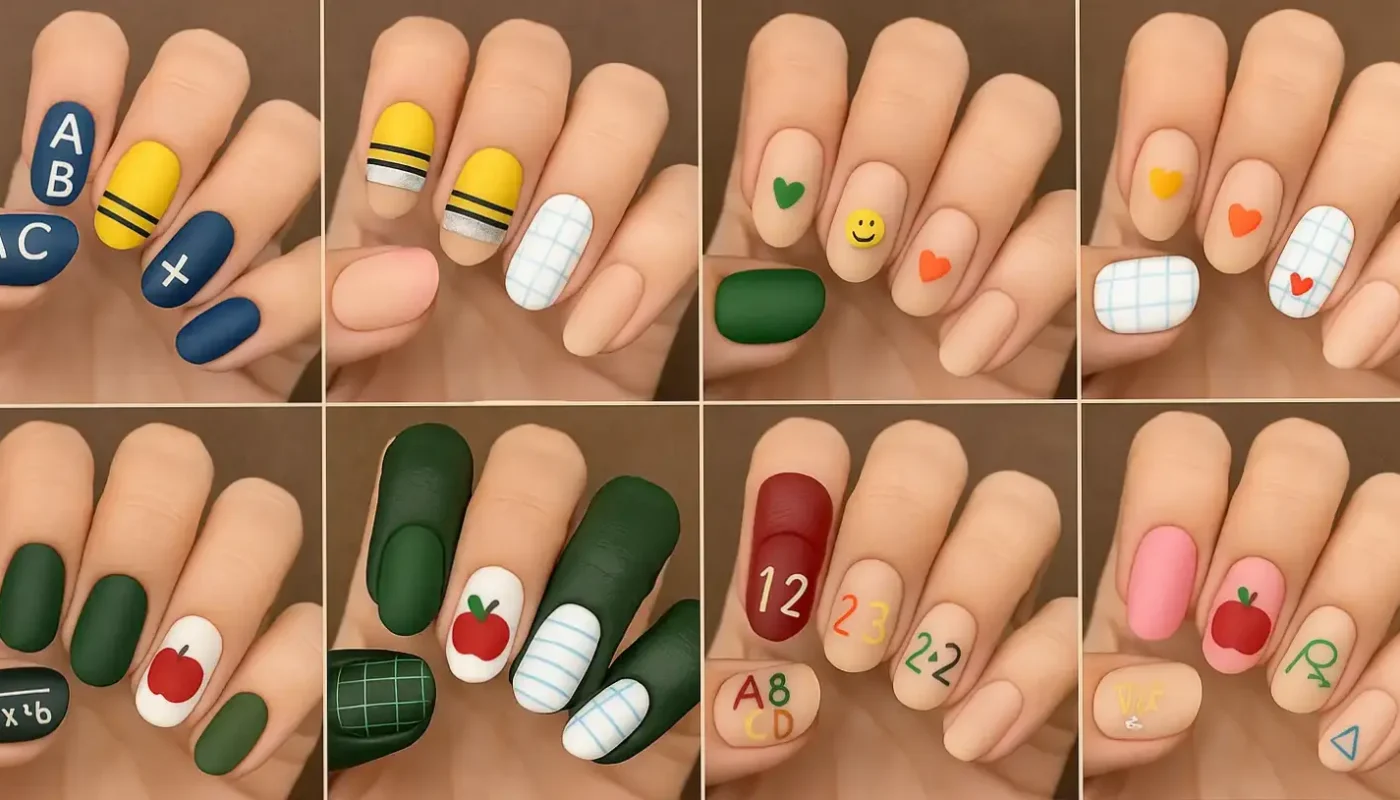
2. Chalkboard Accent Nails with Math Form
Chalkboard accent nails featuring math formulas are a unique nail art design perfect for the back-to-school season. This creative look is ideal for students who want to showcase their love for mathematics.
Difficulty Level: Intermediate
This design requires some skill and patience, making it suitable for those with intermediate nail art experience. The complexity of the math formulas and the chalkboard effect demands attention to detail.
Materials Needed
- Black nail polish for the base
- White nail polish for the chalk effect
- Nail art brush
- Nail dotting tool
- Clear top coat
Step-by-Step Tutorial
Creating the Chalkboard Base
Start by applying a black base coat to the accent nails. This will serve as the chalkboard. Allow it to dry completely before proceeding.
Adding Mathematical Elements
Using a white nail polish and a nail art brush, carefully paint math formulas onto the black base. You can use a dotting tool to create small details. For a more realistic chalk effect, gently drag the brush to mimic chalk strokes.
Here’s a simple guide to get you started:
| Step | Description |
| 1 | Apply black base coat |
| 2 | Paint white math formulas |
| 3 | Seal with clear top coat |
Styling Tips
To enhance the overall look, pair your chalkboard accent nails with simple, solid-colored nails on the other fingers. Consider using a clear top coat to seal your design and add shine.
By following these steps, you can achieve a unique and educational nail art design that’s perfect for the school season.
3. Colorful Bookstack Ombré Design
Celebrate your love for reading with the colorful bookstack ombré nail design, a perfect blend of education and style. This vibrant nail art is inspired by stacks of colorful books and is sure to be a hit among students and book lovers alike.
Difficulty Level: Intermediate
To achieve this look, you’ll need a few essential tools and polishes. The intermediate difficulty level means you’ll need some practice to get it just right, but the end result is well worth the effort.
Materials Needed
- Nail polish in various colors for the ombré effect
- Nail art brushes
- Makeup sponge
- Nail art dotting tool
- Top coat
Step-by-Step Tutorial
Creating the colorful bookstack ombré design involves a few key steps. First, prepare your nails with a base coat. Then, follow these steps:
Creating the Gradient Effect
To achieve the ombré effect, apply different colors of nail polish to a makeup sponge and dab it onto your nails. This technique creates a smooth gradient that mimics the colorful stack of books.
Use a nail art brush to paint on book details such as lines to resemble book spines. You can also add a few dotting tool details to look like labels on the books.
| Step | Description | Tool/Polish |
| 1 | Apply base coat | Base coat |
| 2 | Create ombré effect | Multi-color polish, makeup sponge |
| 3 | Add book details | Nail art brush, dotting tool |
Styling Tips
To complete the look, pair your colorful bookstack ombré nails with a simple, elegant outfit. This nail art is a statement piece, so keep the rest of your look understated. You can also experiment with different color combinations to match your personal style or school colors.
4. School Spirit Colors with Mascot Accent
Show your school pride with a nail design that incorporates your school spirit colors and a mascot accent. This design is perfect for students, teachers, and alumni alike who want to showcase their team spirit.
Difficulty Level: Beginner to Intermediate
This design requires some basic nail art skills, but the end result is well worth the effort. The color blocking technique used in this design is easy to master, and the mascot silhouette adds a fun touch.
Materials Needed
- Nail polish in your school’s spirit colors
- Nail art brush
- Nail guide or stickers
- Top coat
- Nail art dotting tool (optional)
Step-by-Step Tutorial
To create this design, start by prepping your nails with a base coat. Then, follow these steps:
Color Blocking Technique
- Apply the first school spirit color to the entire nail surface.
- Use nail guides or stickers to section off the area where you want to apply the second color.
- Paint the second color over the designated area.
- Remove the guides or stickers to reveal a crisp, clean design.
Mascot Silhouette Creation
To add a mascot accent to your design, follow these steps:
- Use a nail art brush to paint the mascot silhouette onto the nail.
- You can freehand the design or use a nail stamp to achieve a more precise image.
- Allow the polish to dry completely before sealing with a top coat.
Styling Tips
To take your school spirit nail design to the next level, consider the following styling tips:
- Pair your nail design with school-themed accessories, such as a necklace or hair clip.
- Use a nail art dotting tool to add additional details to your mascot silhouette.
- Experiment with different school spirit colors to create a unique and personalized design.
| Design Element | Description | Tips |
| Color Blocking | Using two or more colors to create a design | Use nail guides for a crisp edge |
| Mascot Silhouette | A silhouette of your school’s mascot | Freehand or use a nail stamp for precision |
| Top Coat | Seals the design and adds shine | Apply a thin layer to avoid pooling |
5. Apple and ABC Block Nail Art
Celebrate the back-to-school season with a fun and colorful apple and ABC block nail art design that’s sure to turn heads. This creative nail art is perfect for students and teachers alike, combining a playful apple motif with educational ABC blocks.
Difficulty Level: Intermediate
While this design may look complex, it’s achievable with some practice and patience. The intermediate difficulty level is due to the detailed work required for the apple and ABC block elements.
Materials Needed
- Nail polish in red, green, and white
- Nail art brushes
- Nail dotting tool
- Nail glue
- Top coat
Step-by-Step Tutorial
To create this unique design, follow these steps carefully.
Creating the Apple Design
Start by painting a red apple shape on your nail using a nail art brush. Add a green leaf on top using a dotting tool for the stem.
Next, use white nail polish to paint ABC blocks around the apple. You can add letters or numbers to make it more educational and fun.
Styling Tips
To complete the look, pair your apple and ABC block nail art with a simple outfit. “Nail art is all about having fun and expressing yourself,” says celebrity nail artist, Jane Smith. “Don’t be afraid to get creative and try new designs.”
For a more dramatic effect, consider adding glitter on top of your design or using different colors for the apple and ABC blocks.
6. Notebook Paper Design with Doodles
Bring the charm of notebook paper to your fingertips with a nail design that’s perfect for students and creatives alike. This unique nail art combines the classic lined paper effect with personalized doodles, making it a fun and creative way to express yourself.
Difficulty Level: Intermediate
This design requires some skill and patience, especially when creating the lined paper effect and adding doodles. However, with the right tools and a bit of practice, you can achieve a professional-looking finish.
Materials Needed
- Nail polish in white, blue, and other colors of your choice
- Nail art brushes
- Dotting tool or a small dotting brush
- Nail art stampers or striper for lined effect
- Top coat
Step-by-Step Tutorial
To create this look, start by prepping your nails with a base coat. Then, follow these steps:
Creating the Lined Paper Effect
- Apply a white or light-colored base coat to your nails.
- Use a nail art stamper or striper to create evenly spaced lines, mimicking lined paper.
- Allow the polish to dry completely before proceeding.
Adding Personalized Doodles
Once the lined paper effect is dry, use a dotting tool or a small nail art brush to add doodles. You can draw simple shapes, stars, or even write out your name or initials.
- Use a contrasting color to make your doodles stand out.
- Keep your doodles simple, especially if you’re new to nail art.
Styling Tips
To complete the look, apply a top coat to seal in your design and add shine. You can also experiment with different colors and patterns to make your nail art truly unique.
7. Preppy Plaid Pattern Nails
For a classic and sophisticated nail design, preppy plaid pattern nails are an excellent choice for the school season. This timeless look can be achieved with a bit of practice and the right materials.
Difficulty Level: Intermediate to Advanced
Creating preppy plaid pattern nails requires some skill, making it suitable for those with intermediate to advanced nail art experience. The design involves layering and precision, but the result is well worth the effort.
Materials Needed
- Nail polish in various colors (typically red, black, and white for a classic plaid)
- Nail art brushes
- Nail tape or stickers for creating straight lines
- Top coat
Step-by-Step Tutorial
Creating the Plaid Base
Start by applying a base coat to protect your nails. Then, paint a white or light-colored base coat on your nails. Once dry, use nail tape to create a grid pattern. Paint the grid lines with your chosen plaid colors, typically starting with the lightest color.
After the base grid is dry, remove the tape and paint perpendicular lines to create the plaid pattern. Use a nail art brush for precision. Seal your design with a top coat.
| Color | Usage |
| Red | Primary plaid line color |
| Black | Secondary plaid line color |
| White | Base coat |
Styling Tips
To enhance your preppy plaid pattern nails, pair them with outfits that feature plaid or stripes for a coordinated look. For a more subtle approach, balance bold nail art with simpler clothing. Experiment with different color combinations to match your personal style or school colors.
8. Varsity Letter Accent Nails
If you’re looking for a nail design that’s both sporty and stylish, varsity letter accent nails are the way to go. This bold look is perfect for students who want to showcase their team spirit and add a personal touch to their nail art.
Difficulty Level: Intermediate
Creating varsity letter accent nails requires some skill, but with the right materials and a bit of practice, you can achieve this look at home. It’s considered intermediate because it involves detailed work with nail guides or stickers.
Materials Needed
- Nail polish in your school colors
- Nail guides or stickers for the varsity letter
- Top coat
- Nail art brush
Step-by-Step Tutorial
To create this look, start by painting your nails with a base color that matches your school colors. Once dry, use nail guides or stickers to create the varsity letter on one or more accent nails.
Creating the Varsity Letter
Use a nail art brush to paint the varsity letter, making sure it’s bold and clear. You can use a single letter or add multiple letters depending on your design preference.
Adding Sporty Elements
To enhance the sporty vibe, consider adding elements like stars, stripes, or even a small mascot near the varsity letter. This adds a fun and personalized touch to your nail art.
Styling Tips
To complete the look, pair your varsity letter accent nails with a simple yet stylish outfit. Consider wearing clothing with your school colors to tie everything together. Don’t be afraid to experiment with different nail art designs and sporty elements to make your varsity letter accent nails truly unique.
9. Quick and Easy Back to School Nails for Busy Students
I’ve got you covered with simple yet stylish back-to-school nail ideas that won’t take up too much of your time. As a busy student, you need nail designs that are not only stylish but also quick to achieve.
Difficulty Level: Beginner
These designs are perfect for those who are new to nail art. They require minimal tools and are easy to execute.
Materials Needed
- Nail polish in your school colors
- Nail glue
- Nail art brushes
- Top coat
Step-by-Step Tutorial
Start by applying a base coat, followed by your chosen nail polish color. Use nail art brushes to create simple designs like stripes or dots.
5-Minute Design Options
For a quick look, try a simple striped design or a single accent nail with a fun design.
Long-Lasting Tips
To make your nail art last longer, apply a top coat and avoid using your nails as tools.
Styling Tips
Pair your nail art with your school outfit for a cohesive look. You can also add some nail stickers or nail charms
Conclusion: Start Your School Year with Confidence and Style
As we dive into the new school year, expressing yourself through nail art is a great way to boost your confidence and showcase your personal style. The top 10 back-to-school nail designs presented in this article offer a range of creative and stylish options to suit your taste.
From classic French tips to bold and colorful designs, these nail art ideas are perfect for making a statement. Whether you’re heading back to class or just want to refresh your look, these designs will inspire you to try something new and exciting.
By incorporating back to school nail designs into your beauty routine, you’ll not only be on-trend but also exude confidence and style throughout the school year. So, get ready to start your school year off right and make a lasting impression with your unique nail art.
FAQ
What are the most popular back-to-school nail designs?
Some of the most popular back-to-school nail designs include pencil and ruler French tips, chalkboard accent nails with math formulas, and colorful bookstack ombré design.
What materials do I need to create these nail designs?
The materials needed vary depending on the design, but common supplies include nail polish, nail art brushes, dotting tools, and nail guides. For more advanced designs, you may also need nail tape, stickers, or stencils.
Are these nail designs suitable for beginners?
Yes, some of the designs, such as pencil and ruler French tips and quick and easy back-to-school nails, are perfect for beginners. More complex designs, like preppy plaid pattern nails, may require intermediate to advanced nail art skills.
How can I make my nail art last longer?
To make your nail art last longer, use a base coat, apply thin coats of polish, and finish with a top coat. Avoid using your nails as tools, and wear gloves when doing dishes or using harsh chemicals.
Can I customize these designs to fit my personal style?
Absolutely! You can customize the designs by using different colors, adding personal symbols or charms, or modifying the design to fit your school spirit or personal interests.
How long does it take to create these nail designs?
The time it takes to create these nail designs varies depending on the complexity of the design. Simple designs, like quick and easy back-to-school nails, can be completed in as little as 5 minutes, while more intricate designs may take longer.
Are there any special tips for creating nail art with math formulas or other detailed designs?
Yes, to create detailed designs like math formulas, use a small nail art brush and a steady hand. You can also use nail guides or stickers to help you achieve a crisp, clean design.
Can I use these nail designs for other occasions besides back-to-school?
Yes, many of these designs can be adapted for other occasions, such as holidays or special events, by changing the colors or theme. For example, you can create a Halloween-themed design by using orange and black polish and adding spider or pumpkin elements.


